Tuesday, July 30, 2013

XACT_ABORT { ON | OFF }


SET value XACT_ABORT, It is used for run time error handling. as per  msdn It Specifies whether SQL Server automatically rolls back the current transaction when a Transact-SQL statement raises a run-time error.

If we are setting ON then in case of run-time error entire transaction will be terminated and rolled back, see it with example.


CREATE TABLE TestTable (Column1 INT NOT NULL)
GO

Now we just need to test it with a run-time error like


TRUNCATE TABLE TestTable
GO

SET XACT_ABORT ON
GO
BEGIN TRAN
insert into TestTable values (1)
insert into TestTable values (NULL)
insert into TestTable values  (3)
COMMIT TRAN
GO

SELECT * FROM TestTable
GO

And the result will be 
So no row inserted in table entire transaction terminated and rolled back, now lets check same with OFF 

TRUNCATE TABLE TestTable
Go

SET XACT_ABORT OFF --Optional as OFF is default value
GO
BEGIN TRAN
insert into TestTable values (1)
insert into TestTable values (NULL)
insert into TestTable values  (3)
COMMIT TRAN
GO

SELECT * FROM TestTable
GO

Now check the result

Both records inserted only except one which leads to error, Only the statement that raised the error is rolled back and the transaction continues processing. According to msdn
When SET XACT_ABORT is OFF, in some cases only the Transact-SQL statement that raised the error is rolled back and the transaction continues processing. Depending upon the severity of the error, the entire transaction may be rolled back even when SET XACT_ABORT is OFF. OFF is the default setting.
Compile errors, such as syntax errors, are not affected by SET XACT_ABORT.
It is useful when we need to rollback entire transaction if there is any error.


Columnstore index feature in SQL Server 2012

By: Sushil Rout

There are two types of storage available in the database; RowStore and ColumnStore.

In RowStore, data rows are placed sequentially on a page while in ColumnStore values from a single column, but from multiple rows are stored contiguously. So a ColumnStore Index works using ColumnStore storage.
column store versus row store in SQL Server
Now let's show how we can create a ColumnStore Index and how performance can be improved.

Creating a Column Store Index

Creating a ColumnStore Index is the same as creating a NonClustered Index except we need to add the ColumnStore keyword as shown below.
The syntax of a ColumnStore Index is:
CREATE NONCLUSTERED COLUMNSTORE INDEX ON Table_Name (Column1,Column2,… Column N)

Performance Test

I used the AdventureWorks sample database for performing tests.
--Create the Test Table
USE [AdventureWorks2008R2]
GO
SET ANSI_NULLS ON
GO
SET QUOTED_IDENTIFIER ON
GO
CREATE TABLE [dbo].[Test_Person](
 [BusinessEntityID] [int] NOT NULL,
 [PersonType] [nchar](2) NOT NULL,
 [NameStyle] [dbo].[NameStyle] NOT NULL,
 [Title] [nvarchar](8) NULL,
 [FirstName] [dbo].[Name] NOT NULL,
 [MiddleName] [dbo].[Name] NULL,
 [LastName] [dbo].[Name] NOT NULL,
 [Suffix] [nvarchar](10) NULL,
 [EmailPromotion] [int] NOT NULL,
 [AdditionalContactInfo] [xml](CONTENT [Person].[AdditionalContactInfoSchemaCollection]) NULL,
 [Demographics] [xml](CONTENT [Person].[IndividualSurveySchemaCollection]) NULL,
 [rowguid] [uniqueidentifier] ROWGUIDCOL  NOT NULL,
 [ModifiedDate] [datetime] NOT NULL
) ON [PRIMARY] TEXTIMAGE_ON [PRIMARY]
GO
-- We Populated this table with the Data Stored in Table Person.Person.
-- As we need Plenty of data so we ran the loop 100 times.
INSERT INTO [dbo].[Test_Person] 
SELECT P1.*
FROM Person.Person P1
GO 100
-- At this point we have 1,997,200 rows in the table.
-- Create Clustered Index  on Coloun [BusinessEntityID] 
CREATE CLUSTERED INDEX [CL_Test_Person] ON [dbo].[Test_Person]
( [BusinessEntityID])
GO
-- Creating Non - CLustered Index on 3 Columns
CREATE NONCLUSTERED INDEX [ColumnStore__Test_Person]
ON [dbo].[Test_Person]
([FirstName] , [MiddleName],[LastName])

-- Creating Non - CLustered  ColumnStore Index on 3 Columns
CREATE NONCLUSTERED COLUMNSTORE INDEX [ColumnStore__Test_Person]
ON [dbo].[Test_Person]
([FirstName] , [MiddleName],[LastName])
At this point we have created the ColumnStore Index on our test table. Now we will run the SELECT query with and without the ColumnStore Index and analyze performance.

Query Without ColumnStore Index

select [LastName],Count([FirstName]),Count([MiddleName])
from dbo.Test_Person 
group by [LastName]
Order by [LastName]
OPTION (IGNORE_NONCLUSTERED_COLUMNSTORE_INDEX)
We have used the OPTION(IGNORE_NONCLUSTERED_COLUMNSTORE_INDEX) query hint to not to use the ColumnStore Index this time.

Query With ColumnStore Index

select [LastName],Count([FirstName]),Count([MiddleName])
from dbo.Test_Person 
group by [LastName]
Order by [LastName]
Here are the Actual Execution Plans for both queries:
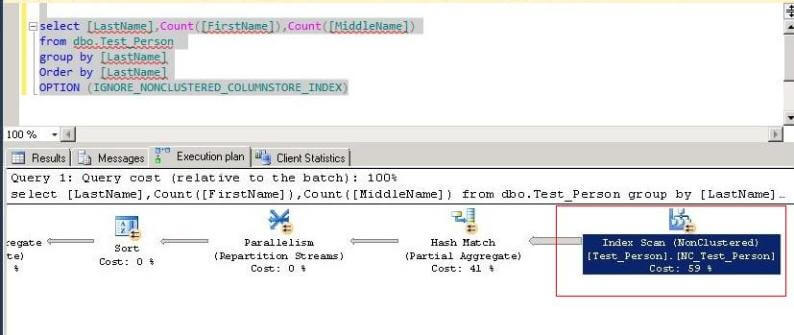
sql server query plan for non columnstore query

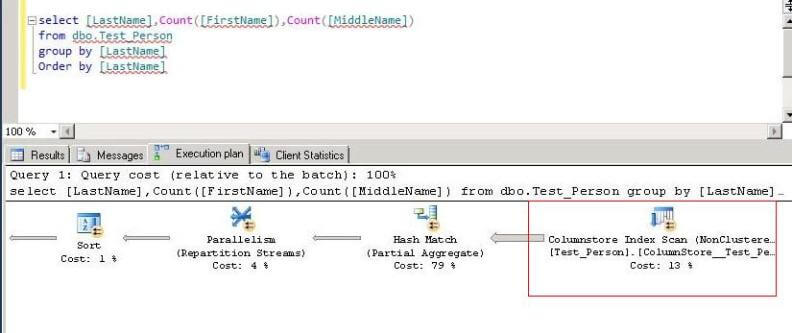
sql server query plan for columnstore query
We can see the cost when using the NonClustered Index is 59 % while using the ColumnStore index is 13%.
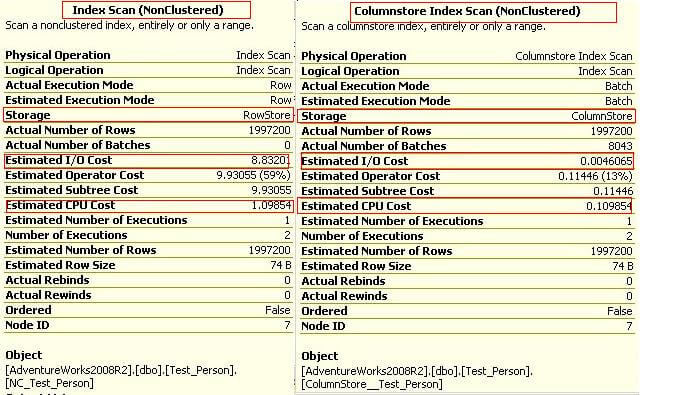
Now if we hover the mouse over the Index Scans we can see details for these operations.  The below is a comparison:
execution plan output for columnstore query
It is clear from the results that the query performs extremely fast after creating the ColumnStore Index as the column needed for the query is stored in the same page and the query does not have to go through every single page to read these columns.

Performing INSERT, DELETE or UPDATE Operations

We cannot perform DML ( Insert\ Update \ Delete ) operations on a table having a ColumnStore Index, because this puts the data in a Read Only mode. So one big advantage of using this feature is a Data Warehouse where most operations are read only.
For example, if you perform a DELETE operation on a table with a ColumnStore Index you will get this error:
 Msg 35330, Level 15, State 1, Line 1
DELETE statement failed because data cannot be updated 
in a table with a columnstore index. Consider disabling the 
columnstore index before issuing the DELETE statement, 
then rebuilding the columnstore index after DELETE is complete.
However, to perform the operation we would need to disable the ColumnStore Index before issuing the command as shown below:
ALTER INDEX 'Index Name' on 'table name' DISABLE

Creating a ColumnStore Index using Management Studio

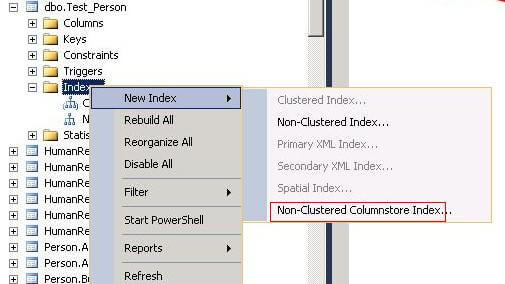
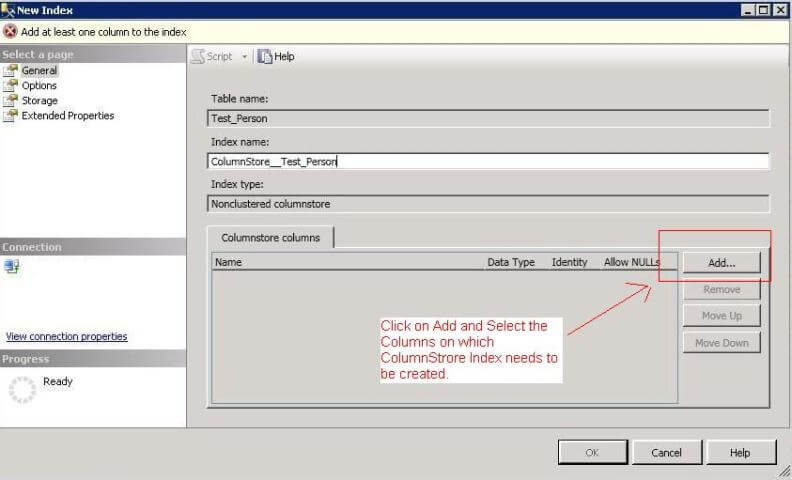
Right click and select New Index and select Non-Clustered Columnstore Index...
create columnstore index using SSMS
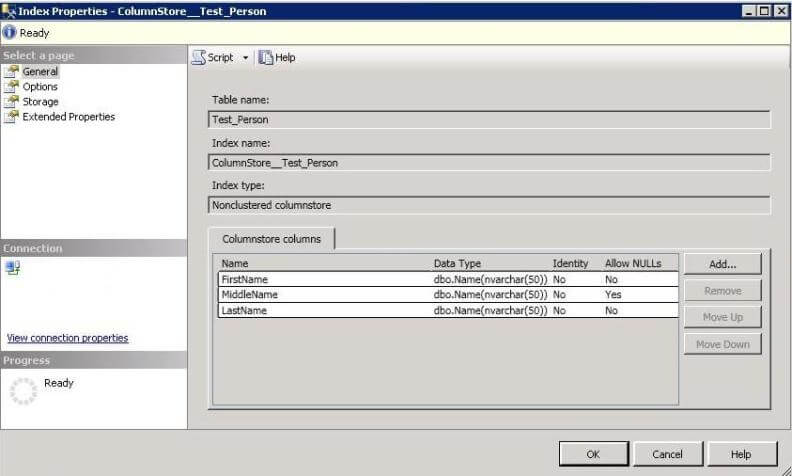
Click add to add the columns for the index.
create columnstore index using SSMS select columns
After selecting the columns click OK to create the index.
save columnstore index using SSMS

Limitations of a ColumnStore Index

  1. It cannot have more than 1024 columns.
  2. It cannot be clustered, only NonClustered ColumnStore indexes are available.
  3. It cannot be a unique index.
  4. It cannot be created on a view or indexed view.
  5. It cannot include a sparse column.
  6. It cannot act as a primary key or a foreign key.
  7. It cannot be changed using the ALTER INDEX statement. You have to drop and re-create the ColumnStore index instead. (Note: you can use ALTER INDEX to disable and rebuild a ColumnStore index.)
  8. It cannot be created with the INCLUDE keyword.
  9. It cannot include the ASC or DESC keywords for sorting the index.

Thursday, July 25, 2013

Reclaiming unused space from a table

--create a test table

CREATE TABLE dbo.Test
        (
         col1 INT
        ,col2 VARCHAR(50)
        ,col3 VARCHAR(MAX)
        ) ;

--create some test data

DECLARE @cnt INT ;
SET @cnt = 0 ;
WHILE 1 = 1
        BEGIN
                SELECT
                        @cnt = @cnt + 1 ;
                INSERT
                        dbo.Test ( col1,col2,col3 )
                VALUES  (
                         @cnt
                        ,'test row # ' + CAST(@cnt AS VARCHAR(100))
                        ,REPLICATE('A',@cnt)
                        ) ;
                IF @cnt = 1000
                        BREAK ;
        END
--check the size of the table

SELECT
        alloc_unit_type_desc
       ,page_count
       ,avg_page_space_used_in_percent
       ,record_count
FROM
        sys.dm_db_index_physical_stats(
             DB_ID()
            ,OBJECT_ID(N'dbo.Test')
            ,NULL
            ,NULL,'Detailed') ;
 --drop the last column and run check the size of the table (Above Query)

ALTER TABLE dbo.Test DROP COLUMN col3 ;

--We get the same results - 221 data pages, storing 3000 rows, each 89% full - even after dropping the column that consumed the most space.

--reclaim the space from the table run check the size of the table (Above Query)
-- This time we will reclaim space

DBCC CLEANTABLE('TestingPerformance', 'dbo.Test') ;

Grant Execute Permission on Schema Level To User

--Create The Login

Use master

CREATE LOGIN [SchemaLevelPermission] WITH PASSWORD=N' ¦]è}ÕGpÆå¡Kƒ¼_
çÅDEFAULT_DATABASE=[master],
DEFAULT_LANGUAGE=[us_english],
CHECK_EXPIRATION=OFF,
CHECK_POLICY=ON
GO


-- Create The User


USE [AdventureWorks2008R2]
GO
CREATE USER [SchemaLevelPermission] FOR LOGIN [SchemaLevelPermission]
GO

-- Create Database Roles

USE [AdventureWorks2008R2]
GO

CREATE ROLE [DBR_SchemaLevelPermission] AUTHORIZATION [dbo]
GO


-- Grant Execute Permission on Schema Level To User

use [AdventureWorks2008R2]
GO
GRANT EXECUTE ON SCHEMA::[HumanResources] TO [SchemaLevelPermission]
GO


Tuesday, July 23, 2013

IF FRAGMENATION < 30 THEN REORGANIZE INDEX. IF FRAGMENTATION >= 30 THEN REBUILD INDEX

/*
IF FRAGMENATION < 30 THEN REORGANIZE INDEX
IF FRAGMENTATION >= 30 THEN REBUILD INDEX
*/

-- Ensure a USE  statement has been executed first.
SET NOCOUNT ON;
DECLARE @ObjectID int;
DECLARE @IndexID int;
DECLARE @PartitionCount bigint;
DECLARE @SchemaName nvarchar(130);
DECLARE @ObjectName nvarchar(130);
DECLARE @IndexName nvarchar(130);
DECLARE @PartitionNum bigint;
DECLARE @Partitions bigint;
DECLARE @Frag float;
DECLARE @Command nvarchar(4000);

-- Conditionally select tables and indexes from the sys.dm_db_index_physical_stats function
-- and convert object and index IDs to names.

SELECT
    object_id AS objectid,
    index_id AS indexid,
    partition_number AS partitionnum,
    avg_fragmentation_in_percent AS frag
INTO #work_to_do
FROM sys.dm_db_index_physical_stats (DB_ID(), NULL, NULL , NULL, 'LIMITED')
WHERE avg_fragmentation_in_percent > 10.0 AND index_id > 0;

-- Declare the cursor for the list of partitions to be processed.

DECLARE partitions CURSOR FOR SELECT * FROM #work_to_do;
-- Open the cursor.
OPEN partitions;
-- Loop through the partitions.
WHILE (1=1)
    BEGIN;
        FETCH NEXT
           FROM partitions
           INTO @ObjectID, @IndexID, @partitionnum, @frag;
        IF @@FETCH_STATUS < 0 BREAK;
        SELECT @objectname = QUOTENAME(o.name), @SchemaName = QUOTENAME(s.name)
        FROM sys.objects AS o
        JOIN sys.schemas as s ON s.schema_id = o.schema_id
        WHERE o.object_id = @ObjectID;
        SELECT @indexname = QUOTENAME(name)
        FROM sys.indexes
        WHERE  object_id = @ObjectID AND index_id = @IndexID;
        SELECT @partitioncount = count (*)
        FROM sys.partitions
        WHERE object_id = @ObjectID AND index_id = @IndexID;
-- 30 is an arbitrary decision point at which to switch between reorganizing and rebuilding.
        IF @frag < 30.0
            SET @command = N'ALTER INDEX ' + @IndexName + N' ON ' + @SchemaName + N'.' + @objectname + N' REORGANIZE';
        IF @frag >= 30.0
            SET @command = N'ALTER INDEX ' + @IndexName + N' ON ' + @SchemaName + N'.' + @objectname + N' REBUILD';
        IF @partitioncount > 1
                    SET @Command = @Command + N' PARTITION=' + CAST(@PartitionNum AS nvarchar(10));
                            EXEC (@Command);
        --PRINT N'Executed: ' + @command;
    END;
-- Close and deallocate the cursor.
CLOSE partitions;
DEALLOCATE partitions;
-- Drop the temporary table.
DROP TABLE #work_to_do;
GO

/*
UPDATE STATISTICS IMMEDIATELY AFTER REBUILD & REORGANIZE OPERATION PERFORMED.
*/


SET NOCOUNT ON
DECLARE @columnname VARCHAR(MAX)
DECLARE @tablename SYSNAME
DECLARE @statsname SYSNAME
DECLARE @sql NVARCHAR(4000)
DECLARE @NAME VARCHAR(MAX)
declare @i INT
declare @j INT

CREATE TABLE #Temp
(
TableName VARCHAR(1000),
StatsName VARCHAR(1000),
ColumnName VARCHAR(1000)
)
insert #Temp(TableName,StatsName,ColumnName)
SELECT DISTINCT
OBJECT_NAME(s.[object_id]),
s.name AS StatName,
COALESCE(@NAME+ ', ', '')+c.name
FROM sys.stats s JOIN sys.stats_columns sc ON sc.[object_id] = s.[object_id] AND sc.stats_id = s.stats_id
JOIN sys.columns c ON c.[object_id] = sc.[object_id] AND c.column_id = sc.column_id
JOIN INFORMATION_SCHEMA.COLUMNS D ON D.[COLUMN_NAME]= C.[NAME]
JOIN sys.partitions par ON par.[object_id] = s.[object_id]
JOIN sys.objects obj ON par.[object_id] = obj.[object_id]
WHERE OBJECTPROPERTY(s.OBJECT_ID,'IsUserTable') = 1


CREATE TABLE #Temp1
(
id int identity(1,1),
TableName VARCHAR(8000),
StatsName VARCHAR(8000),
ColumnName VARCHAR(8000)
)
insert #Temp1(TableName,StatsName,ColumnName)
select TableName,StatsName,stuff(
(
  select ','+ [ColumnName] FROM #temp where
StatsName = t.StatsName for XML path('')
),1,1,'')
from (select distinct TableName,StatsName from #Temp )t
SELECT @i=1
SELECT @j=MAX(ID) FROM #Temp1
WHILE(@I<=@J)
BEGIN
SELECT @statsname = statsname FROM #Temp1 where id = @i
SELECT @tablename = TableName FROM #Temp1 where id = @i
SELECT @columnname = columnname FROM #Temp1 where id = @i
SET @sql = N'UPDATE STATISTICS '+QUOTENAME(@tablename)+QUOTENAME(@statsname)
PRINT @sql
EXEC sp_executesql @sql

SET @i = @i+1
END
DROP TABLE #Temp
DROP TABLE #Temp1

Friday, July 19, 2013

Instant File Initialization Speeds SQL Server

Next, I populated the database with over 61 million rows of data, which virtually occupied all of the available space within the newly created database. After that, I backed up the database using SSMS, and then I deleted the original database.
At this point, I restored the database from the backup using SSMS. Below, you see the typical Restore Database screen.
image 
At the bottom, right-hand side of the screen in the Progress box, notice the “Executing (0%)” indicator. Between the time I clicked the OK button to begin the restore, and when the “Executing (0%)” counter began to move, it took about 5 minutes and 50 seconds. At that point, the counter began to increment and the database was restored.
Now I make one very small change to my SQL Server instance (I’ll describe it in just a moment), and then I repeat the above steps (after deleting the database I just restored). First, I created a new 50GB database. This time, instead of taking 5 minutes and 50 seconds to create the database, it takes just under 2 seconds, a savings of about 5 minutes and 48 seconds. Next, I populated the database with the same amount of data as before, backed it up, and then deleted the original file. When I restored the database this time around, instead of having to wait 5 minutes and 50 seconds before the backup began to restore, I only had to wait just under 2 seconds. In both of these cases, I saved a significant amount of time.
So what was the very small change that I made, and why did it radically reduce the amount of time for database creation and database restoration to occur? I turned instant file initialization on.
What is Instant File Initialization?
In my first two examples, before instance file initialization was turned on, the reason it took so long for the database to be created, or the database to be restored (before a database can be restored, its space must first be pre-allocated, much like creating a new database), SQL Server had to go to every page in the 50 GB database and zero each one of them out. It can take a lot of time for SQL Server to go to every 8K page in a file (especially very large files) and physically zero out each page. When instant file initialization is turned on, SQL Server doesn’t have to zero out every 8K page that has been allocated. Instead, the space is just allocated to SQL Server by the operating system in one fell swoop, which is a very quick process, potentially saving you a great deal of time.
How Do You Turn Instant File Initialization On?
Unlike most configuration features in SQL Server, there is no on/off switch for instant file initialization. Instead, you have to assign a specific user right to the SQL Server Service (mssqlserver) account. Here’s what you need to do to turn on instant file initialization.
First of all, to use instant file initialization with SQL Server in a production environment, you must be using some combination of:
  • Windows Server 2003 or
  • Windows Server 2008 or
  • Windows Server 2008 R2
and using:
  • SQL Server 2005 (any edition) or
  • SQL Server 2008 (any edition) or
  • SQL Server 2008 R2 (any edition)
Second, you must assign the SQL Server Service (mssqlserver) a special user right called “Perform volume maintenance tasks”. To do this, start the Local Security Policy tool (you must be a local administrator to perform this task), then drill down to Security Settings | Local Policies | User Rights Assignment | Perform volume maintenance tasks, as you see in the screenshot below.
Once you have located “Perform volume maintenance tasks”, right-click on it and select “Properties”, and the “Perform volume maintenance tasks Properties” screen appears. Click on “Add User or Group” and then proceed through the remaining screens until you select the account that is being used as the service account for SQL Server. In the screen shot below, notice that I have added the BRADMCGEHEEsqlserverservice account to this user rights assignment. This is the user account I use on my test server to run my SQL Server instance.
Once the SQL Server service account has been assigned this user right, you will have to restart the SQL Server service (of course, only when it is not being used), and from this point forward, instant file initialization is turned on for all MDF files in your SQL Server instance.
Note: If your SQL Server service account is a member of the local administrators group, then the account already has the “Perform volume maintenance tasks” user right and you don’t need to assign it again.
Why Isn’t Instant File Initialization Turned On by Default?
When a SQL Server instance is first installed, one of the things you must enter is a SQL Server service account. If you follow the best practice and select a domain user account to be used as the SQL Server service account, the setup process automatically assigns the domain user account with only just enough rights and permissions to run SQL Server. The “Perform volume maintenance tasks” user right is not automatically assigned during installation because it is not required to run SQL Server, and because allowing the service account to have this additional user right introduces a very small security risk.
Oh no, a security risk! Well, not really much of a security risk. Here’s the possible security risk scenario. The disk that is being used to create the new database on has been used for storing data that has been previously deleted. As you may know, when data is deleted from disk by the operating system, it really is not physically deleted; the space holding the data is just marked as being available. At some point, the older data will be overwritten with new data. This occurs all the time on millions of computers throughout the world every day. And as such, any data that has been marked for deletion, but not yet overwritten, is potentially available for access if you have the right tools and know what you are doing. In fact, undelete software uses this to recover data that has been accidently deleted.
When instant file initialization is not turned on, and when SQL Server allocates space for an MDF file, each of the pages allocated for the database is
zeroed out, which removes the older data, in theory, preventing it from being accessed. I say “in theory” because there are computer forensics techniques that can even recover data that has been overwritten, but that discussion is really not applicable here.
So if instant file initialization is turned on, there is a very slight risk that someone could go to the pages allocated for the new database and read any older data that still may exist there. This is essentially a non-issue in virtually every organization, other than those that require very high security. But because of this potential security issue, instant file initialization is not turned on by default.
If instant file initialization is turned on, and pages are not zeroed out when the database is initially created, SQL Server will automatically overwrite any data that might have been on those pages when SQL Server needs that space.
When Is Instant File Initialization Used?
If instant file initialization is turned on, it is used in all of these cases:
  • When a database is first created
  • When a an existing database’s size is manually increased
  • When tempdb is recreated each time SQL Server is restarted
  • When autogrowth kicks in
  • When backups are restored (as the space has to be pre-allocated before a restore can occur) 
Instant file initialization only affects MDF and NDF files, not LDF files. In other words, transaction log files can’t take advantage of instant file initialization. This is because log files are circular in nature and must be zeroed out, as random data in transaction log pages can be problematic. In my earlier test, when I created a new 50 GB database, the MDF file was 50 GB and the log file was only 1 MB. If I had created a large log file (which is not uncommon), it would have taken awhile for the log to be created, although the MDF file would have been instantly created. This is also true when you manually increase the size of a log file, or when log file autogrowth occurs. In other words, don’t expect to have all of your databases (MDF and LDF files) created in less than 2 seconds like in my test. While the MDF will be created virtually instantly, the log file may take awhile to be created.
When I was working with SQL Server 2000 a few years back, which does not support instant file initialization, one of the things that annoyed me the most when restoring large databases was waiting for the database space to be allocated before the restore actually began. During emergency database restores, this wasted a lot of precious time, preventing me from getting the database back into production as fast as I would have preferred. If you aren’t using instant file initialization today, you are facing this same problem. That’s why I recommend all SQL Server 2005/2008 instances have instant file initialization turned on. The time saved when restoring databases is the best reason to use instant file initialization.
Check to See if Your SQL Server Instances Have Instant File Initialization Turned On
Hopefully, by now, you see the benefits of using instant file initialization. Assuming that you don’t already know if instant file initialization is turned on or off on the SQL Servers your manage, I challenge you to check and see, and if you find it turned off, turn it on and reap its many benefits.
  

SQL Server 2008 Audit

SQL Server 2008 Audit

Previous versions of SQL Server have included a variety of built-in ways to audit activity inside SQL Server. These included:
Login Auditing: Only tracks user login successes and/or failures. Results are sent to the OS Application Log.
SQL Server Profiler (SQL Trace) Audit and Related Events: Profiler includes over 40 specific audit events, and over 130 additional events that can be traced. Results are stored in trace files.
DDL Triggers: DDL triggers can be added to a database to identify when any DDL event occurs.
C2 Audit Mode: This former auditing standard (now superseded by Common Criteria Compliance) uses SQL Trace to capture audit events, which are stored in trace files.
Common Criteria Compliance: A new international auditing standard which also uses SQL Trace to capture data, which are stored in trace files.
None of the above methods offer much granularity, most are not easy to administer, and with the exception of Login Auditing, they can add a large amount of overhead to running SQL Server, hurting its performance.
To help overcome these problems, SQL Server 2008 includes a feature called SQL Server Audit. SQL Server 2008 Enterprise Edition includes all of the features described in this article, which includes both the SQL Auditing Foundation and Fine Grained Auditing. SQL Server 2008 Standard Edition only provides the SQL Auditing Foundation.

Advantages of SQL Server Audit

SQL Server Audit includes these features and benefits:
The Ability to Audit at the Instance and Database Levels: When you configure an audit, you are given the ability to capture audit events at the instance-level or the database-level. In most cases, you will probably want to audit events at both levels.
The Ability to Audit Many Different Activities: SQL Server Audit includes many predefined activities that you can audit, including DML and DDL activity. In addition, you can even audit “audit activities”. In other words, the activities of DBAs, whose job it is to manage SQL Server Audit, can be monitored by outside parties, if so desired.
The Ability to Capture and View Audit Results: Audit results can be captured and stored in disk files, or in the operating system’s Event Logs. Data on disk can be imported into a database for further analysis and reporting. Data stored in Event Logs can be viewed using the Event Log Viewer.
High Granularity: SELECT, INSERT, UPDATE, DELETE, REFERENCES and EXECUTE statements can be captured for individual users at the object level, if desired.
Fast and Lightweight: SQL Server Audit uses SQL Server 2008′s Extended Events engine to capture audit data. This results in fast performance and minimal overhead as compared to using SQL Trace to capture activity.
Easy to Setup and Administer: SQL Server Audit can be setup and managed using either SSMS (SQL Server Management Studio) or Transact-SQL.

Limitations of SQL Server Audit

While SQL Server Audit includes many nice features, it also has some drawbacks you need to consider:
While SQL Server Audit takes up less physical resources than SQL Trace-based auditing options, it still uses SQL Server resources, and the more detailed your auditing, the more resources that are used. Because of this, it may not be practical to use SQL Server Audit on very busy OLTP servers, especially if they are already experiencing hardware bottlenecks.
SQL Server Audit is instance-based. In other words, there is no easy way to manage SQL Server Audit on all the SQL Server instances in your organization from a centralized location, unless you create your own method using scripts.
Audit data is stored either in a file, or as part of the operating system’s event logs. If you want to be able to analyze and report on this data, you will have to manually import it into your own database. In addition, DBAs will have to manually archive or delete old audit data.
There is no built-in reporting, other than looking at the events in the Log Viewer, assuming that is where you store the audit data. For effective reporting, you will have to create your own reports, most likely using SQL Server Reporting Services.

How SQL Server Audit Works

When you first begin using SQL Server Audit, you may find it somewhat unintuitive and a little confusing. In this section, I want to start with a high-level overview of how it works. In the following section, I will provide a short demonstration of it in action, so you can better see how it all fits together. The flow chart shown in Figure 1 should provide a broad overview of what’s involved in setting up auditing:
clip_image002
Figure 1: A flow chart showing how to create a new SQL Server Audit
SQL Server Audit allows you to create many different audits, covering most every activity that occurs inside SQL Server.
The first step when creating a new audit is to create a SQL Server Audit object. When you create a new SQL Server Audit object, you assign it a name, select from several configuration options, and you designate a target. A target is the location where the audit data will be stored. A target can be a file on disk, the Applications Event Log, or the Security Event Log. Once you have completed these steps, the new SQL Server Audit object is saved.
The second step is to create what is called an Audit Specification. SQL Server Audit offers two different types of Audit Specifications:
1. Server Audit Specifications - used when you want to audit an activity that occurs at the SQL Server instance level, such as auditing login and logout activity.
2. Database Audit Specifications - used when you want to audit an activity within a database, such as who is SELECTing data from a particular table.
Server and Database Audit Specifications are created differently so you need to decide which type you need up-front. When creating either type of Audit Specification, you first assign it a name, and then you must associate the Audit Specification with the SQL Server Audit object created in the first step. The rule is that a SQL Server Audit object can only be associated with one Audit Specification. In other words, you can’t reuse SQL Server Audit objects when you create Audit Specifications. And the last step to creating a Server Audit Specification is to assign it an Audit Action Type. An Audit Action Type is a predefined activity that occurs in SQL Server that can be audited.
When creating a Database Audit Specification, you assign it a name; then you associate the Audit Specification with a SQL Server Audit object; and specify an Audit Action Type, just as you do with a Server Audit Specification. However, in addition, you must also specify an Object Class (database, object, or schema), the name of an object to audit, and the security principal (the user account) that you want to audit.
Once the Audit Specification is completed, you must then enable both the SQL Server Audit Object and its associated Audit Specification. At this point, audit events will begin to be collected in the designated target.
And last, to view the audit data, you have several choices. If you store audit data in a file, you can import it into a database for viewing and reporting. If you store it in one of the two Event Logs, you can view it using the Event Log Reader.
I have left out a lot of details, but the above illustration and explanation should give you a fair understanding of how the overall process works.

A Simple Auditing Example

SQL Server Audit can be configured and managed using either SQL Server Management Studio (SSMS) or Transact-SQL commands. In this simple demonstration, we will use SSMS to create a simple audit because it is easier to understand for DBAs new to SQL Server Audit.
Creating an audit, and reviewing audit results using SSMS, is a four-step process, as outlined in the previous section:
1. Creating the Audit object
2. Creating a Server or Database Audit Specification
3. Starting the Audit
4. Reviewing Audit Events
In the following example, we want to find out who is looking at the HumanResources.EmployeePayHistory table in the AdventureWorks database. In other words, we want an audit trail of everybody who runs a SELECT statement against this table. Obviously, in the real world, your audit would be more comprehensive, but my goal here is only to provide a simple yet illustrative demonstration of how auditing works.

Creating the Audit Object

The first step is to create a new audit object. To create a new audit object using SSMS, go to the SQL Server instance you want to audit, open up “Security,” and you will see the “Audits” folder, as shown in Figure 2:
clip_image004 
Figure 2Choose “New Audit” to create an audit from within SSMS.
Right-click on the “Audits” folder and select “New Audit,” and the “Create Audit” dialog box appears, a shown in Figure 3:
clip_image006
Figure 3: To create an audit, you have to assign it a name and specify where the audit data will reside.
The first thing you need to do is to decide if you want to use the name that is automatically generated for you as the audit object name, or to assign your own name. Since numbers don’t mean much to me, I assigned it my own name.
Next, you have to provide a “Queue Delay” number. This refers to the amount of time after an audit event has occurred before it is forced to be processed and written to the log. The default value is 1000 milliseconds, or 1 second. While I am going to accept the default for this demo, you might want to consider increasing this value if you have a very busy server.
The next option on the screen is called “Shut down server on audit log failure”. If you select this option, and later SQL Server is restarted, and for whatever reason the audit data can’t be logged, then SQL Server will not start, unless you manually start it at the command line using a special parameter. This option should only be used in environments where very tight auditing standards are followed and you have 24/7 staff available to deal with the problem, should it occur.
Next, beside “Audit,” in the dialog box, there is a drop-down box with “File” selected by default. This option is used to tell SQL Server where you want the audit logs to be stored.
clip_image008
Figure 4Three are three options where you can store audit data.
SQL Server Audit allows you to store audit data in a file, in the Security Log, or the Application Log. If you choose “File”, then you must also specify the location of the file, along with additional information, such as how much data it can collect, and so on. If you choose Security Log or Application Log, then the audit results are stored in these Windows Operating System Event Logs. I am going to choose “Application Log”. Once this is done, the dialog box should look as shown in Figure 5:
clip_image010
Figure 5Once all the data has been provided, click “OK” to create the audit.
Now that the audit has been configured, click on “OK” to save it. It should then appear in the SSMS Object Browser, as shown in Figure 6:

clip_image012
Figure 6Notice the red arrow next to the newly created audit.
The red arrow next to the audit object means that it is not currently enabled. That’s OK for now, we can enable it later.

Creating a Server or Database Audit Specification

Now that we have created the audit, we need to create the matching audit specification. If we wanted to do an instance-wide audit, we would create a server audit specification. But for this example, where the goal is to audit the SELECT activity on a single table in a single database, a database audit specification is created.
To create a database audit specification using SSMS, open up the database to be audited, then open up the security folder under it. Next, right-click on “Database Audit Specifications” and select “New Database Audit Specification”, as shown in Figure 7:
clip_image014
Figure 7: To create a database audit specification, you must do so from within the database you want to audit.
The “Create Database Audit Specification” dialog box appears, as shown in Figure 8:
clip_image016
Figure 8: The “Create Database Audit Specification” dialog box has many options to complete.
You can either choose to accept the default name assigned to this database specification, or you can enter your own. Next, select the appropriate audit object from the Audit dropdown box, as shown in Figure 9:
clip_image018
Figure 9: The “Create Database Audit Specification” dialog box has many options to complete.
In this case there is only one audit object, the “EmployeePayHistory”, as this is a newly installed SQL Server and doesn’t have any other audit objects on it.
Next, you must specify the kind of audit activity you want to capture by selecting from the “Audit Action Type” drop-down box, as shown in Figure 10:
clip_image020
Figure 10You can select from many pre-defined audit actions.
For this example, I want to choose the “SELECT” “Audit Action Type,” as the goal is to record all SELECT activity for the payroll table. Of course, you can choose any audit action type you want, but you can only choose from those that are listed. You can’t create your own.
Now that the audit action type has been chosen, the “Object Class” must be chosen – see Figure 11:
clip_image022
Figure 11: In this case, you can choose from three object classes.
The object class allows us to narrow down the scope of what we want to audit. For this example, because we want to monitor activity on a table, “Object” is selected.
The next step is to specify the object, or the table name, that is to be audited. To do this, click on the browse button under “Object Name,” and the “Select Objects” dialog box appears, as shown in Figure 12:
clip_image024
Figure 12: The “Select Objects” dialog box allows you to select which object to audit.
Having clicked on the “Browse” button, the list of available objects will appear, as shown in Figure 13:
clip_image026
Figure 13: Select the object to be audited from this list.
Browse through the “Browse for Object” dialog box until you find the object or objects you want to audit, then select them. Above, I have selected a single table: HumanResources.EmployeePayHistory.
Once the objects have been selected, click “OK,” and the “Select Object” dialog box reappears, as shown in Figure 14:
clip_image028
Figure 14: The audited object has been selected.
Now that the object to be audited has been selected, click “OK,” and you are returned to the original “Create Database Audit Specification” dialog box, as shown in Figure 15:
 clip_image030 
Figure 15: We now see all of our actions up to this point.
There is one last step, and that is to specify what security principals (user accounts) that we want to monitor. To do this, click on the browse button under “Principal Name,” and another “Select Object” dialog box appears.
I am going to spare you seeing this screen again, and skip immediately to the “Browse for Object” dialog box, where you can see what principals you can choose from, as shown in Figure 16:
clip_image032 
Figure 16: Select the principal you want to audit.
In this case, public is chosen, because the goal of this audit is to identify anyone who runs a SELECT against the payroll table. Optionally, you can select on specific users or roles. Click on “OK” for this dialog box, then click on “OK” for the “Select Objects” dialog box, and we reach the final screen, seen on Figure 17: 
clip_image034 
Figure 17: We are finally done creating the database audit specification.
Since we are only interested in auditing this one table for a single action, we will stop now. If you wanted to, you could continue to add addition actions and objects to this audit specification. Click on “OK,” and the database Audit Specification will be saved, and you can view it in object explorer, as shown in Figure 18:
clip_image036 
Figure 18: Notice the red arrow next to the specification, which tells us that it is turned off.
Once the new database audit specification has been created, it has a red arrow next to it, indicating that it is turned off. We will turn it on in the next step.

Starting the Audit

I have saved the steps of starting the audit till last because I wanted to show you that when you create an audit object, and a database audit specification, that they are turned off by default, and both must be turned on before audit data is collected.
First, turn on the audit object, which in our case is called “EmployeePayHistory,” then turn on the database audit specification, which in our case is called “EmployeePayHistoryAudit.” To turn these on, right-click on them, one at a time, and select “Enable Audit.” Auditing has now begun. At this point, any SELECT statements run against the HumanResources.EmployeePayHistory table are recorded and stored in the Application Events log file.

Reviewing Audit Events

Now, let’s see what all this work has done for us. To find out, open up the “Application Log File Viewer” and take a look. In this example, you’ll see something similar to Figure 19: 
clip_image038 
Figure 19: When you click on an audit event, this is the detail information you see.
Because the log is large and hard to easily fit on a screen, I have scrolled to one of the many events in the Application Log (there a lot more you can’t see) and clicked on it. As you can see in figure 19, the details of the event provide a lot of information about a SELECT statement that ran against the audited table. Because of the potentially large quantity of information you can get back when using SQL Server Audit, I would suggest you store audit data to file, import this data into a SQL Server database, and then use Transact-SQL or Reporting Services to analyze the data. Using the Event Viewer to review audit data, as I have done here, is not very efficient.

Summary

While this seemed like a lot to cover, it is just small sample of how the SQL Server Audit feature of SQL Server 2008 works. SQL Server Audit is a powerful new tool that allows DBAs to collect almost any activity that occurs within our servers.
Overall, I would suggest that if you have been looking for a SQL Server auditing system, and have been considering purchasing a third-party auditing application, or creating your own, you will want to first carefully evaluate SQL Server Audit to see if it can meet your SQL Server auditing needs.